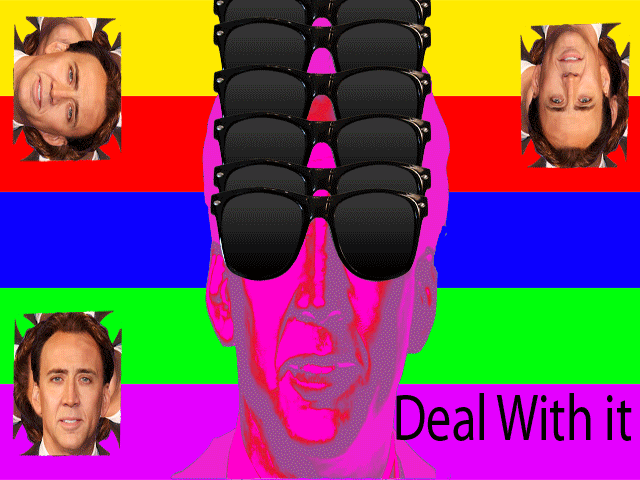
This is my first nine weeks project
first you make a new document with the resolution to 640-480
Then you open up a picture of nicholas cage going to file then open.
You the find a picture of sunglasses
You open that picture in photoshop and then use move tool to drag it into the nicholas cage photo
You then copy nicholas cage and the press control t to resize him and put him in each corner.
You make one facing each way up and down and left and right.
Using the text tool you then right deal with it in the bottom right corner.
Then to make the background you use the rectangular marquee tool put each bar in and fill it with a random color.
You then go to select color range choose shadows
you do the same thing but pick midtones
again you do the same thing except you pick highlights
You then make a two copies of each layer that you selected.
You then fill each one with a color of your choice
You then go to window and choose animation in the drop down menu
You then will see a window pop up.
You make new slides with the little paper icon.
You click on each slide and make a layer visible
so you first start out with normal colored nicholas cage.
Then you drag the sunglasses down a little bit and choose the next slide.
When the sunglasses are all the way onto his face you then make the colored slides visible including the background and small nicholas cages in the corner.
You then make the layers that have only one nicholas cage in the corner visible for each slide.
you then do the same with the layers that are shadows and midtones of it.
You then can place the slides that have these images in a random order to get the product
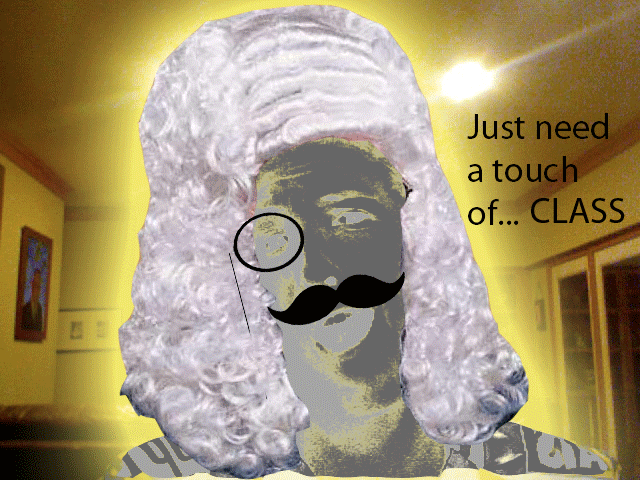
You open a picture of yourself, a wig, and a monocle and mustache in photoshop.
You then use the magnetic lasso tool and drag it around the wig, mustache, and monocle. You then drag it into the picture of yourself.
The you use the magnetic lasso tool around your face again and go to select, color range and select shadows
you then copy that selection into a new layer using control J
you do the same thing above but you choose midtones and highlights instead of shadows
You then go to edit, fill and choose different shades of a gray color.
you then fill each layer selection that you have made
you then right click on those layers that you have selected and click merge down
you then click the text option and right Just need a touch of..."
You then click it again and make another text layer saying "CLASS"
You then align them to make them look like one.
you then go to window and choose animation.
You then make two slides clicking the icon on the bottom that looks like paper.
To make a layer visible in the slide it must have the eye visible.
the first slide will have the normal picture of you with the first text layer. Both visible. Nothing else
and the second slide will have the wig, monocle, mustache, gray version of you with the other text layer visible instead of the other one.
You then save it and cherish it forever
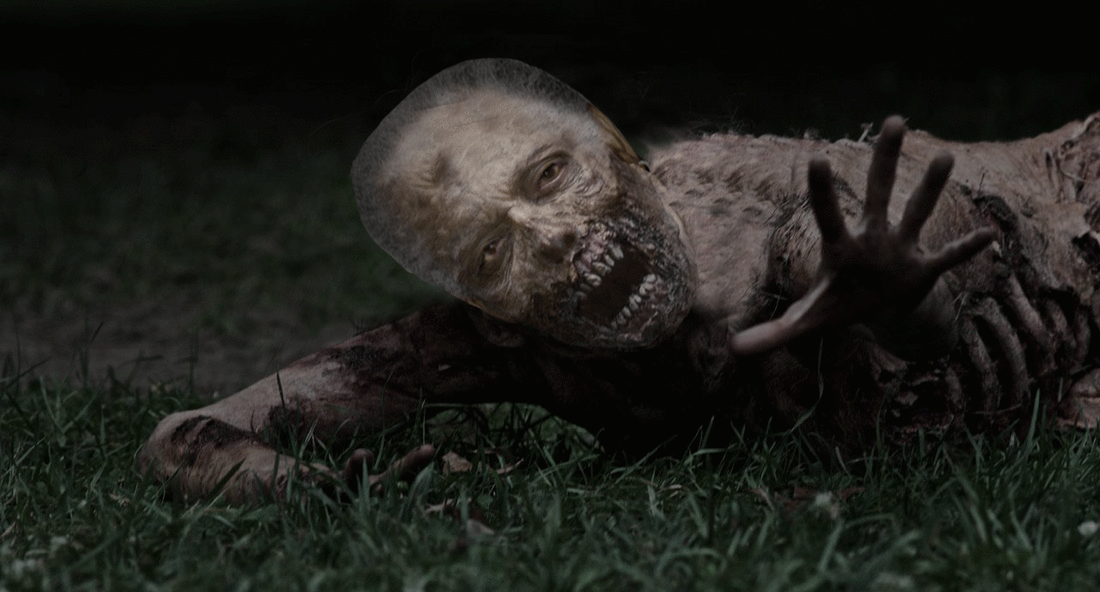
First you open a picture of MOrgan Freeman and the walking dead woman
First you cut out MOrgan Freemans head with the magnetic lasso tool. You then do the same thing with the face of the zombie
You then drag Morgan Freemans face over to the zmobie file and you resize it to be perfectly aligned with the zombies head.
You then use the eraser tool to erase to pupils so they show through. You then Get the clone stamp and you press alt on the back of the body.
You then run it over the hair of the zombie so it looks like MOrgan Freeman doesnt have Fabio hair. You the use the clone stamp again on the grass to replace the hair that is over the grass.
You then create a new layer and you fill it with black using CTrl Backspace.
You then get the eraser tool and you set the hardness to 0% and you set the size to 400
You then erase where Morgan Freemans head is so it focuses on it.
You then use the selection tool to cut the zombie head that is over Morgan Freemans head in half. You then copy the bottom half into another layer.
You set the opacity to the mouth layer to 70% and the Top head layer to 50% so you get some of the features of Morgan Freeman's face in the zombie head. You then Select Morgan Freemans head and you select hue and saturation
You set the lightnes to a bit darker but not too dark. Just so it blends in with the head.
This is My Morgan Freeman ZOmbie.
This is my 2nd Nine weeks project
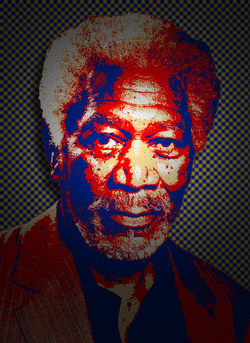
It combines the lighting effect from the three hundred effect, Shepperd Fairy, and the color halftone background.
First you get a picture of Morgan Freeman
you the use the magnetic lasso tool to cut out the background.
YOu then make three copies of the morgan freeman head.
You then make a threshold for each one.
The top layer must be lower than the next.
Same for the middle one.
You then fill the top layer with blue
the middle layer with red
and the 3rd layer with beige
You then do the background with the a white
You then select the blue and yellow in the color pallete.
You then go to the filter gallery and choose color half tone
you then chose dots and put the contrast low and the size a bit greater than the last.
You then make a new top layer
Fill it with black
Then make the opacity 70%
You then select the eraser and set the hardness to 0% and you set the size to 700
you the select the head of MOrgan Freeman
This concludes the picture
